Podcast Episode Workflow 1: Files and Project Setup
This really should be considered Step 0. This is the easiest stage of the workflow and getting it right will equip you for success in creating a better end product and in having a better time doing it. I'm going to outline my process which includes the following tooling, but the premise behind my own workflow would easily apply generally to other projects as well.
- Navigate to the room in Zencastr and download the TXT file of the transcript and the WAV files of each participant.
WAV files are higher quality than MP3 and should always be used when possible. - While these large files are downloading, we will set up our project file structure. Copy the project folder template and rename it to create a place to store all our work.
Refer to the File Structure and Templates section for more information about the template file structure setup. - Once all the files are done downloading...
- Move the transcript file into the 01_TRANSCRIPTS.
- Move the WAV files into the 00_RAW folder.
And we're done with setting up our files! The next step is going to be to set up the new Adobe Audition project. To do so:
- Open Adobe Audition
- Click on "File" -> "New" -> "Multitrack Session"

- Name the podcast and select the location for the episode. I like to use the same naming convention for both the project folder and the project name. The location of the project should be the 02_PROJECT folder in our file structure.
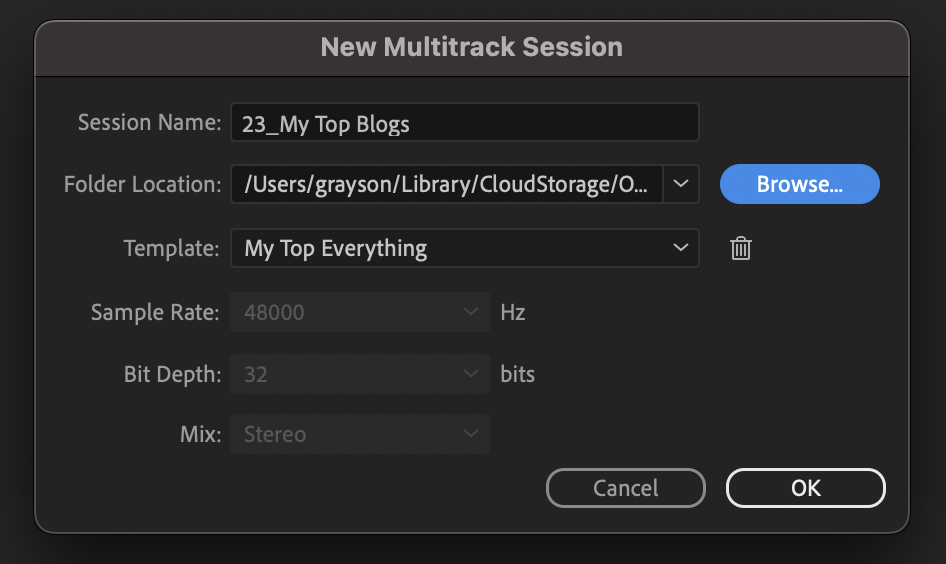
Refer to the File Structure and Templates section for more information about using multitrack session templates in Adobe Audition. - Click OK. Now our project is set up in the correct place, but we need to import our raw audio files and pull them into the tracks:

- Click on the "Import Media" button in the top left of your editing window.
- Select all the WAV files from the 00_RAW folder from the project file structure.
- Drag the newly imported files into their own separate tracks named after the associated speaker.
- Click "Save." This will bring up the following warning dialog. What this is effectively asking is if you'd like to copy the raw track into a project folder. Click "Yes."

We say "yes" to this so that when we make changes to the audio files in the Waveform view, we don't actually change the original raw file.
And that's that! Now we have all of our files in place, the project set up, and the beginnings of our podcast workspace! Next up, we need to add any censoring of profanity, names, and places we require.
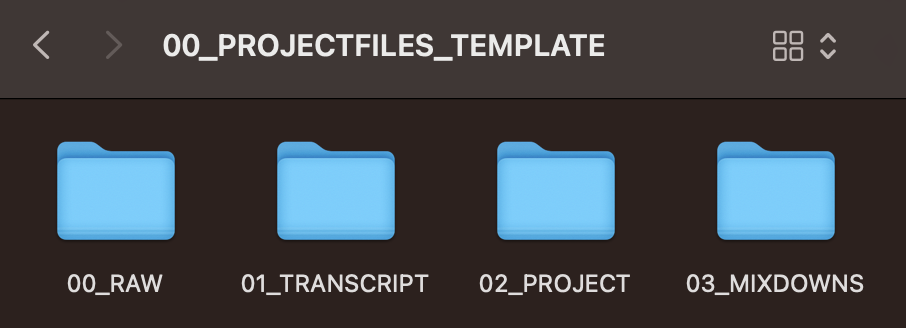
File Structure and Templates
It's helpful to have templates in place to speed up this process. I keep a folder in the podcast file store with empty folders in the following structure so I can simply copy, paste, and rename the folder to be appropriate for the project:
You can also set up a multitrack session template in Adobe Audition since all episodes will generally fit the same structure. In the case of our podcast, we have:
- 4 speakers
- Theme music
- Ad break music
So for our purposes, I have a template in place with 4 mono tracks named for our usual speakers as well as 2 stereo tracks for music, bumped up by 6db because that seems to fit well with the podcast after mastering. I also keep the .sesx template in the Templates folder. However, if you wanted to create your own session template, you could use the instructions on this blog to do so.
