Podcast Episode Workflow Part 2: Censoring Dirty Words
If you're going to censor curse words, you need to do it right. Part of doing it right is doing it first before anything cutting or mastering. This may seem counter-intuitive, but it is actually important to do this right at the beginning of your episode workflow. The reason for this, as you'll see, is that the best way to do censoring is to do it right in the source audio file by using the Waveform view, not editing in the Multitrack view.
This means that as soon as you apply mastering (which comes in the form of effects in Audition) every time you censor a new word those effects will get re-processed and re-applied across all the clips that use the source file. Additionally, if you have done mastering AND started cutting, you will end up redoing the effects for a whole bunch of clips. I know from experience, too, that you will end up with undesired auditory consequences if this happens while you're using the automatic podcast mastering from the Essential Audio toolkit since each clip will be subsequently re-analyzed and mastered independently from the rest of the track. This can lead to things like clips containing nothing more than some breathing getting blown up into a brick of room and organ noise that swallows the entirety of the mix.
Step 1:
The transcript and prerequisites
So we're going to do this first. In our workflow, we are fortunate enough to have a podcast recording and hosting platform that offers a relatively accurate and reliable transcription service. This means that instead of listening to the whole podcast trying to catch every little undesired word, we can just search the transcript for the words in our "no-no list." This is only handy if your transcript has timestamps associated with the blurbs of text, which luckily ours does.
Additionally, we've noticed that our transcripts are highly structured, reliable, and accurate. Therefore reviewing the transcript is actually an excellent job for a robot to do. Refer to this section below for a script that performs the analysis and pumps out an Excel spreadsheet containing all the timestamps, speakers, and text blurbs surrounding all instances of words in a pre-defined list of censorable words. Otherwise, just go ahead and pick your own list of words, open up the transcript in a text editor, and get searching.
But before we get started, I also want to share a shortcut I discovered that makes this process go much, much faster. If you (on Mac) click on "Edit" -> "Keyboard Shortcuts," you can set up custom keyboard shortcuts to help you speed up your workflow and enhance your experience editing. The one we're going to set up here is a shortcut to get to the "Generate Tones" effect window.
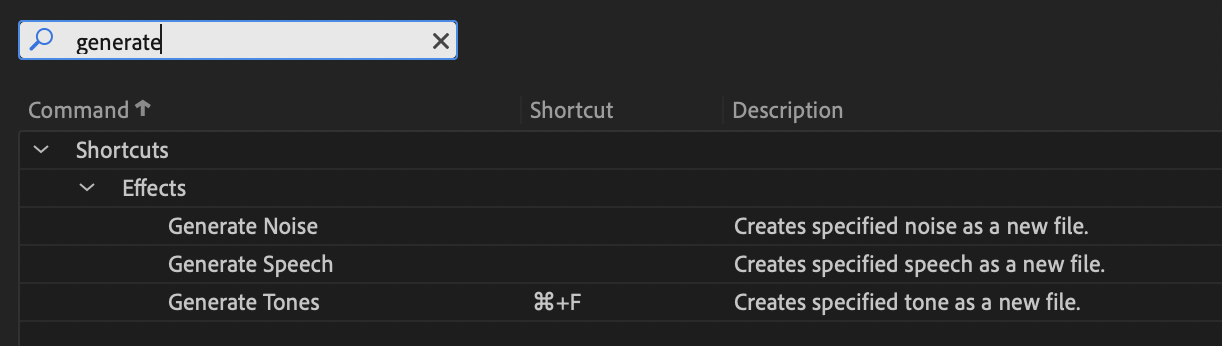
If you search for "generate tones," you will find the command. By clicking in the "Shortcut" field next to the command, you can follow up by pressing your own desired keyboard shortcut. I prefer the shortcut "⌘ + F" for perhaps obvious reasons. Just make sure whatever keyboard shortcut you use is not already being used for something else before you accidentally overwrite it. Once you've done this, pressing your shortcut will bring up the tone generation window which is the lifeblood of this part of the process.
Now that we've got our transcript/spreadsheet and our environment set up the way we want, let's get to the actual steps to add bleeps to our episode.
Step 2:
The grind
In this section, I'm going to be as prescriptive as possible with the process. This is the best way that works for me but you may find that you've got other tools or methods that make you better at this than I am. That's great! You should write your own blog post and send me the link! Until the first edit, though, this is what you're going to do:
- Copy the timestamp from the transcript for the current event you're trying to bleep.
- Paste that timestamp into the timecode selector in the lower left corner of your editing window in Audition and hit "Enter."

- Listen to the segment and identify where the word to be censored is. Transcript analysis will only get you so close to the word, so you'll need to find it with your ears.
Note: Be mindful of transcript events where there's more than one censorable word in the line. - Change to the clip selection tool by pressing "T" on your keyboard use it to highlight the segment of the clip with the censorable word. You just need to be close, not perfect.
- Switch to the Waveform view and zoom in to get a closer look at the waveform. Adjust the start and end of the highlighted portion to only cover the part of the word you want bleeped.
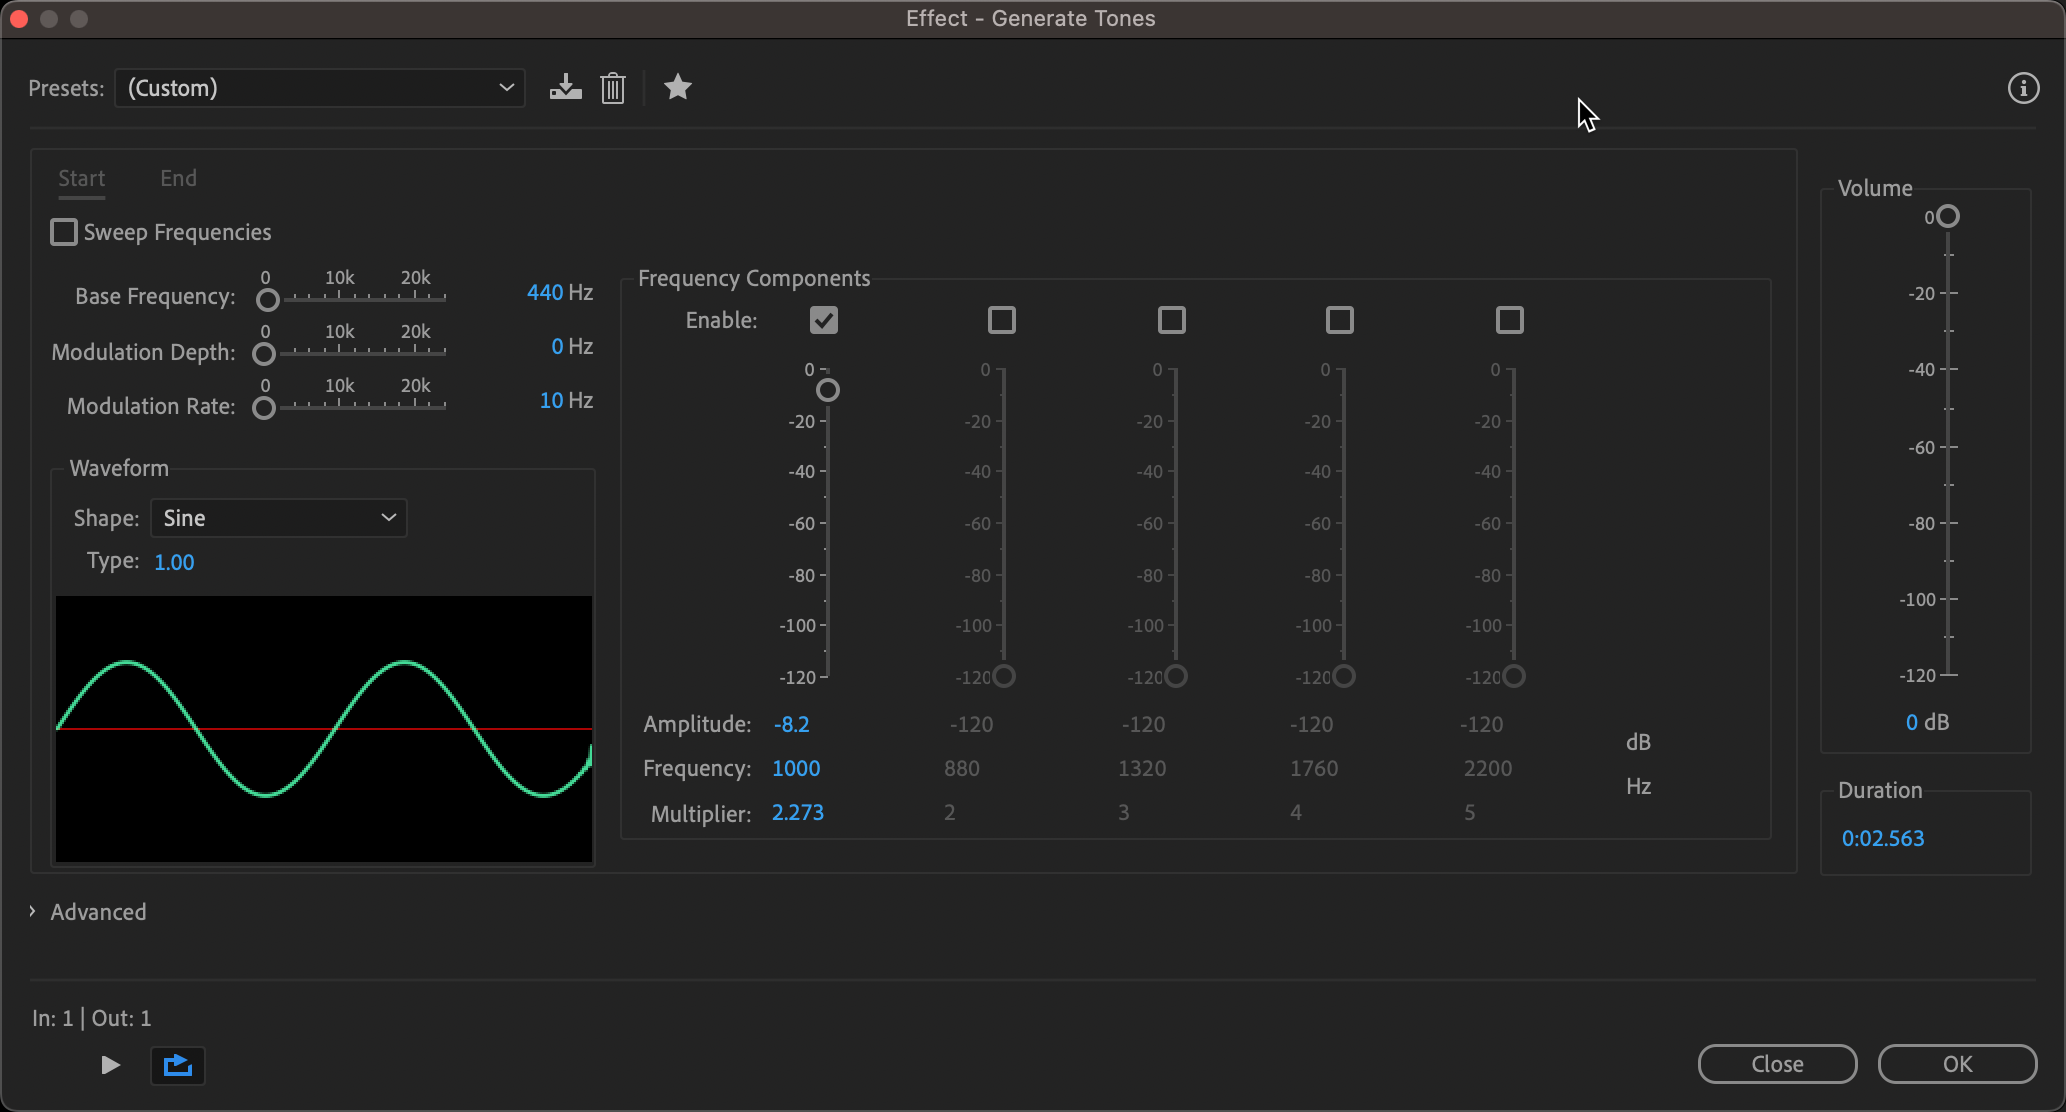
- Press "⌘ + F" to bring up the "Generate Tones" window once you're happy with your selection.
- Make sure the bleep tone is 1000Hz and -8.2db with a multiplier of 2.273. Click "Ok."
- Once you've generated the tone, press "G" on the keyboard to deselect the bleep tone area.
- Move the playhead back and play the bleeped segment of audio to see how it sounds. If it's not to your liking, undo the tone generation and try it again.
- Once you're happy with the bleep, repeat from Step 1 until all undesired words are censored.
That's pretty much it! Once you've gotten all the words (hopefully) censored we can move on to mastering, which I will cover in the next post.
Transcript Analysis Script
I have written a very simple Python script that will automatically do the analysis of a Zencastr recording transcript and output a helpful Excel spreadsheet with all the identified sections containing anything from a pre-defined list of vulgarities. You can find the source code of the script at the following public Github repo page:
GitHub - FathersNelsons/PodcastCensor: Simply python script to detect listed words in a podcast transcriptSimply python script to detect listed words in a podcast transcript - GitHub - FathersNelsons/PodcastCensor: Simply python script to detect listed words in a podcast transcript
But no worries, you don't need to be a developer to use the script. I have provided an executable binary you can download and run without needing any of the dependencies. The instructions for running the script are as follows:
- Download the
get_cursesrelease from Release v1.0.0 · FathersNelsons/PodcastCensor (github.com) - Move the file somewhere useful, maybe into your documents folder
- Navigate to your episode folder, right click "01_TRANSCRIPT" and click "New Terminal at Folder"

- This will open a new terminal window in your transcript folder:

- Replace the file path in the following command with the location of
get_curseson your computer and type it into the terminal:/path/to/file/get_curses transcript.txt - Press "Return"
If you look in your Finder now, you should see that an excel spreadsheet called "identified_sections.xlsx" has appeared! If you open it up, you will a spreadsheet containing every instance of vulgarity along with the timestamp, the speaker, and the corresponding segment of speech that contains the vulgarity. This is a HUGE time saver and should be used if possible!
Tips
- Once you get the Generate Tones window configured correctly, it will hold on to that configuration indefinitely and between sessions.
- If this is an episode you know has names of people or places that need to be censored, now is the time to make those changes. If you catch them later on, we will run into the aforementioned issues with mastering and effects application.
- It is possible to add bleep tones into the multitrack session, but it will insert a new clip of a newly created audio file into the multitrack session instead of applying the tone to the original clip. This can lead to a very, very messy editing process and will consume unnecessary storage on your device and in OneDrive.
